|
Iris Dividing
|
|
Their radiant beauty has a bit of a downside. They need a certain amount of attention. They have one serious pest the Iris borer and they outgrow their space fairly quickly. This growth necessitates regular digging and Iris dividing. 
How Often Must I Dig Them? Depending on their size, from the miniatures through to the majestic Tall Bearded, digging and dividing needs to take place every 3 - 7 years. There is no hard and fast rule as to how often this propagation process needs to happen. In the smaller varieties, it is usually a matter of them outgrowing their allotted space. The larger varieties will just develop an older less viable mass of rhizomes, (they are the fat horizontal stems at the surface of the soil,) in a large centre section. All of the blooming bits will be on a the edges of this mass. Now it is the time for Iris dividing. 
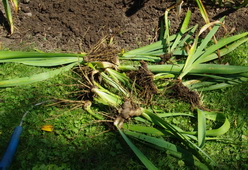
How Do I Do It? Using a strong garden fork to reduce the amount of soil you dig up; remove the whole clump from the ground and knock off as much soil as possible . Cut the leaves to less then half of their length, leaving a stiff fan of healthy green. With your fingers or a strong hand cultivator, separate the multiple rhizomes so that you have several separate sections (2 - 6 cm long) of healthy rhizome with one or two fans of leaves at the end. Your clump should yield several of these. Throw away the large central mass of rhizomes. Your good pieces should have several white fleshy roots hanging from the bottom. Trim these roots about 10 cm long. 
Is That It? No! Make a raised ring of soil around the rhizome so that you can add a significant amount of water to your transplant without it running away. I use a high phosphorous transplanting fertilizer for this initial watering, to induce new root growth. Now you are an expert at Iris dividing. |