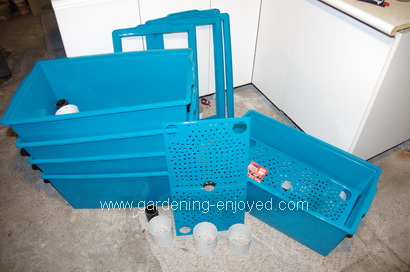
Subirrigation Containers
Build Your Own
Subirrigation containers such as
Earthbox and Grow Box are wonderful for growing a wide variety of vegetables. Some of us think we are handy and can make our own and save money.
The money you think you can save completely depends on how much you value your time. I made one and found it easy to do and it worked just as well. Because I live in Canada, where the shipping costs are higher and the dollar is lower, I can produce an equivalent container for less than half of the online cost. The only worry I have about my home made containers is their longevity. The commercial ones have UV inhibitors in their plastic to extend their outdoor life. It will be interesting to see if the totes that I have used last as long as those commercial containers.
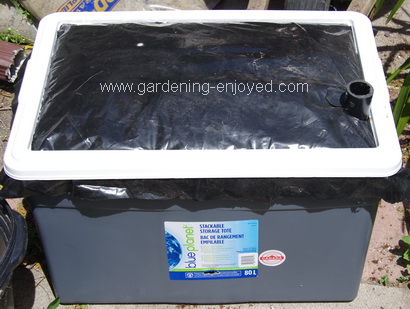
What Does The Tote Need To Be? Opaque, to keep the sunlight off the roots. A relatively soft plastic. A rectangle seems to be more useful then a square. At least 30cm (12") deep to allow for enough soil and a water reservoir. It needs a relatively flat lid with a firm clip onto the bottom. Size is probably the least important but typically something like 70 cm (28") by 40 cm (16") is a good size. Someday I would like to try and build a very large one to see if I could essentially make an entire sub irrigated garden. Colour, who cares.
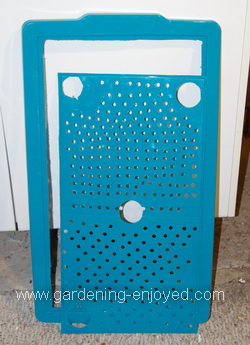
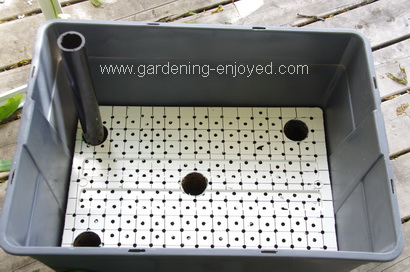
What’s First? One of the important parts of these subirrigation containers is the screen that separates the soil from the water reservoir and making that, is the time consuming part of the operation. Cut out almost the entire flat surface of the lid making sure to leave behind all of the edge that clips onto box.
This Takes The Time! The flat piece that you cut out now needs to have many holes drilled into it to create the screen. You can do this freehand or you can draw a grid if straight lines make you happy. This drilling is the reason for the soft plastic as brittle plastic will often shatter when you drill holes in it. If you plan to make several of these subirrigation containers, buy one tote and try the drilling before committing to the purchase of several. This multi perforated lid should easily drop down inside the tote. If it doesn’t, just trim off some of the edges. It doesn’t need to drop all the way to the bottom. This screen needs to be about 2/3rds of the way down the tote. About 20 cm (8") of soil space above the screen and 10 cm (4") of water reservoir under it.
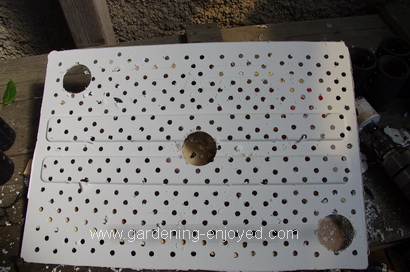
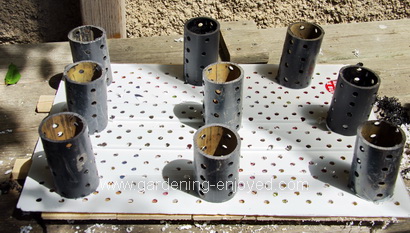
How Does The Water Move? We create wicks using the same soilless mixture that we fill the box with. I use three pieces of 3.8 cm (1.5") pvc pipe each of them about 10 cm (4") long. They have multiple holes drilled in them, small enough to keep the soil inside them but large enough to let the water flow freely, about 3/8". Cut three holes in the screen just slightly smaller than the inside diameter of those pipes. Glue those pipes to the bottom of the screen.
Is That Enough Support? The screen made from the centre of the lid is usually not overly strong and requires several supports under it. The three pipes that are becoming the wicks are a start but you may need a few more to get a firm enough screen to hold all of the wet soil that is going to be sitting on it. I often use a bigger diameter pipe for this to reduce the number that are required. These pipes are the same length as the wick pipes and also have several holes drilled through them to let the water fill them up along with the rest of the reservoir. These support pipes can just be placed in the bottom of the container and don’t need to be glued as long as you fill it with soil right away to prevent them from moving when you move the container.
How Do I Fill The Reservoir? Cut a hole in one corner of the screen just big enough to allow a fill pipe to pass through. A 2.5 - 3.0 cm (1" - 1.25") pipe is cut long enough to reach to the bottom of the tote and rise above the top of it by about 5 cm (2"). This is supported by the soil packed around it as you fill the container and is your fill pipe. Some of the commercial boxes have optional floats that go in these pipes and are connected to a water source so that they fill automatically. I haven’t tried them as yet.
An Important Little Step! When filling the subirrigation container's reservoir it’s very important that the screen and soil are not in the water. That requires an overflow hole. When the screen is in place, mark its level on the side of wall. Remove the screen and measure down about 1.25 cm (0.5") and at that level cut out a small slit that will act as the overflow. Whenever you are filling the reservoir, keep an eye on that overflow and stop filling as soon as water starts to run out of it.
What’s The Lid For? One of the secrets of these containers is the plastic sheet covering the soil. It keeps the rain from dissolving the fertilizer charge and most importantly for me, it prevents any weeds from growing in that container. We cut a piece of black plastic sheeting just larger than the top of the tote and then use the rim of the lid to hold it firmly in place.
How Do I Use It? Check the
Earthbox page of my website for instructions on how to fill the containers with soil and fertilizer.
Return from sub irrigation containers to the home page